Sweap set up for admins
Account setting
Administrator's guide to setting up your account
General account settings
Enable AI Feature
The event tags - creation and usage
Create guest fields for your account
Adding deletion rules to automatically delete guest data
Set up templates
User roles and permissions
Permission sets - Default user roles in Sweap
Permissions and configuration of default permission sets
User permissions and their functions in Sweap
Setting up new users
Roles and permissions
Visibility groups
Event-Ticketing - e-payment with Sweap
API and publishing package function
Implementing the event overview page within your website
Implementing the event overview page in an IHK24 website
Use Sweap's Zapier integration
Import of distributors with EVA
Import groups and committees from EVA master data
Sweap app and devices for check-in
Set up domain and e-mail address
Getting started with Sweap - Basics
Event overview and dashboard
Basic structure of the event overview
The action field and its functions
The calendar view for your events
The event dashboard - overview
Basic functions
Event formats in Sweap
Single event creation with Sweap
What are event series?
Using time zones in Sweap
Duplicate an event to use it as a template
The preview mode for creating e-mails or webpages
Using the correct image sizes
Create text with the HTML-Editor
AI feature in use in HTML editor
Use placeholders in Sweap
Customize headlines and text with HTML
Linking emails and websites in Sweap
Legal notice and privacy policy
Support and data protection at Sweap
Data tracking with Sweap
Privacy policy and GDPR
Questions about security & data protection
Sweap AI - Questions about security & data protection
Increasing security - introduction of Keycloak
Session limits - session limitation
Send your feedback about Sweap
Personal settings
Manage your user settings
Connecting Zoom to your virtual events
Multi-factor authentication with Sweap
Search and filter functions
The search function in Sweap
Using the filter function in Sweap
Last Update and Last Reply of your guests
Best practice, online webinars and updates
Create and manage contacts and guests
Create, import and export guest information
Add guests to your list
The guest import with Excel
Edit guest information and change the status manually
Export your guestlist
Create and manage contacts
Add companions
Manage attributes for guests and divisions
Postal mail invitation and QR code
Setting up and sending e-mails
Individual salutation
The guest salutation
Create guest salutation with our salutation assistent
Use your own salutation form in your e-mails
E-mail builder
The email types and their use
The different types of email templates
The Email template LA LUNA
E-mail builder: creating e-mails
Configure emails - set up an invitation email
Call to Action Button withinin emails
Create mails more efficient with using the duplicating function
Insert links for virtual events into e-mails
Insert stock photos into emails
Send a test e-mail
Font types in emails
Troubleshooting for E-Mails
Opt-In states and bounces
Reduce spam probability of e-mails
Display images correctly in my email
Delivery notification and bounces in the e-mail log
Basics for the successful delivery of e-mails
Tracking email opening rates
Important information about blocked e-mail addresses - status "mailjet: preblocked
Sending out e-mails
Registration pages & Virtual event platform pages
Registration page basics
Registration page - using the Website Builder
Registration page - using the websitze wizard
Templates for your webpage
Contents and modules of a registration page
Texts, colours and design for the registration page
Settings to close the registration page - Website Wizard
Registration options settings within the Website Wizard
Embed your own font in Sweap
CSS & Java Scripts for website customisation
Header and footer within a website
Publish events on your own website
Font types in websites
Setting up the registration form
Configuration of a registration form
Add a checkbox with URL to the registration form
Show and hide form fields
Enter accompanying persons (registration form)
Virtual Event Platform
Integrations and modules for the Virtual Event Platform
Operate and monitor events with Sweap
Table of Contents
- All Categories
- Sweap set up for admins
- User roles and permissions
- Setting up new users
Setting up new users
 Updated
by Julia Walther
In this article we will show you how to create additional users in your Sweap account. You can easily administer the users via your account, add new users, assign roles and permissiones, change users or deactivate/delete them.
As the administrator of a Sweap account, you are free to create new users with roles and correspondingly different permissions within the account settings at any time.
The administrator assigns the user name of the new user and enters an email address. It is also up to the admin to decide whether the user receives his password manually or can set it himself.
1. Creating a new user
The following explains how to create a new user in Sweap. If you have been assigned the appropriate administrative permission under roles, you can create new users. You can read more about roles and user rights here.
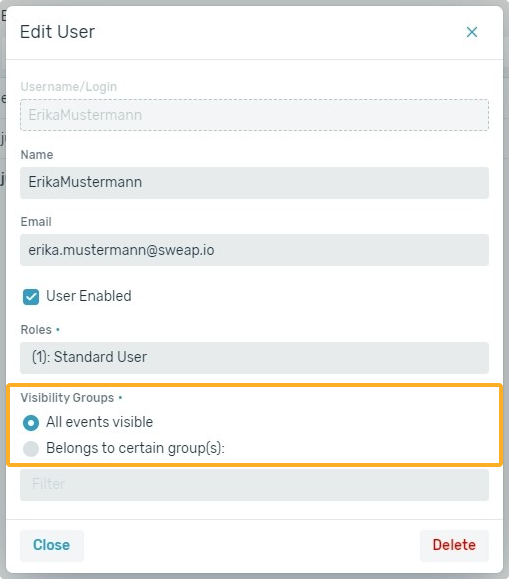
2. Activate visibility group
While creating a new user you also have the option tto assign the user to a visibility group.
As soon as a visibility group is assigned the created user can only see the events within the selected visibility group. Please note that you can also assigne users to multiple visibility groups.
Further information about visibility groups can be found in this article.

